Overview
It is easy to export transactions from Commerce to QuickBooks Online. In this tutorial, we'll see how to export a Sale (invoice) and an Expense (purchase/bill) and post them to QuickBooks Online.
If you change any of your settings in QuickBooks Online (e.g. add a new account to your Chart of Accounts), Commerce will sync your changes on the next export.
Prerequisites
We recommend that you know how to connect an accounting platform and an account in Commerce.
-> Learn how to connect an accounting platform
If applicable, don’t forget to make an expense account in QuickBooks Online for payment processing fees, transaction fees, and marketplace fees. Commerce generates ancillary transactions for netted out fees and deductions from bank deposits, if there are any, so that you can reconcile your operating costs!
Expense Transactions
An Expense in Greenback consists of three different transaction types: Purchase, Bill, or Reimbursement. The transaction type shows on each transaction.
![]()
When you export an Expense from Greenback to QuickBooks Online, each type will map to an expense transaction in QuickBooks Online.
![]()
Sales Transactions
A Sale in Greenback records both the sale and the payment. A Sale consists of two transaction types: Sales Receipt or Refund. When you export a Sale from Greenback to QuickBooks Online, each type will map to either a Sales Receipt (immediate payment) or a Refund in QuickBooks Online.
![]()
If you modify any settings in QuickBooks Online, they will be refreshed in Commerce during the next export.
Export an Expense or Sale Transaction
All users can export transactions one-at-a-time to their connected accounting package.
If you start your workflow in Commerce, the Payment Date field in QuickBooks Online will be auto-filled with the date of the actual transaction. If you start your workflow in QuickBooks Online however, remember that QuickBooks Online defaults to today’s date instead and requires that you verify/correct it later.
To export an Expense or Sale transaction:
- Press the Expenses
 icon OR the Sales
  icon and then choose the company.
 - Click the Export button on the transaction.

Commerce refreshes your settings from QuickBooks Online to ensure everything is up to date.
Commerce auto-fills the Reference Number field with the transaction number when available.
Export Step 1 of 3: New or Matched
Commerce searches for matches and duplicates in all of your QuickBooks Online accounts. If a match is found you have the option to update the matched expense or create a new one.
Updating a matched expense will not cause a duplicate in QuickBooks Online, rather it will update the transaction with additional details and attach the original receipt if available.
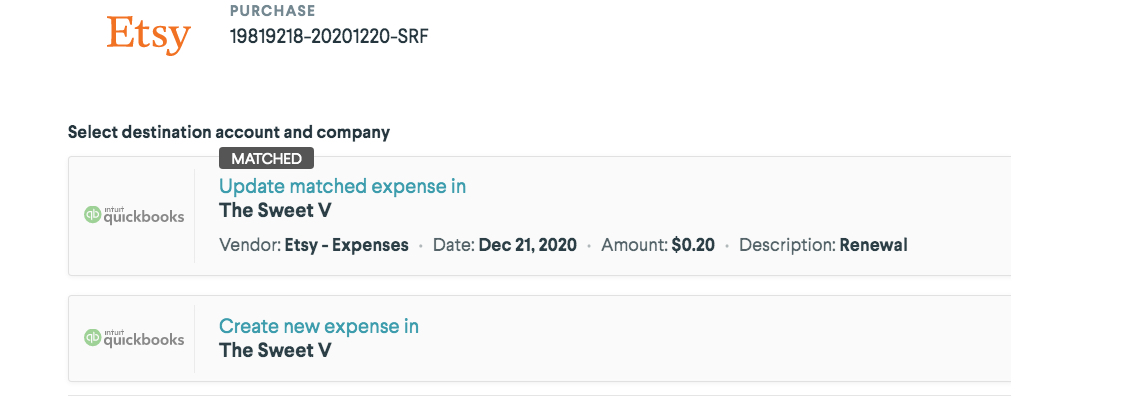
Review matches carefully. Even though Commerce finds similar transactions, you may still intend on creating a new transaction
Export Step 2 of 3: Select Export Options
Commerce displays the fields required to successfully export your transaction to QuickBooks Online. The names of the fields mirror the names QuickBooks Online uses.
To see detailed information about each field check out:
-> The Anatomy of an Expense Export Guide and
-> The Anatomy of a Sales Export Guide
Depending on your plan and what you have enabled/set up in QuickBooks Online, some fields may not show for you.
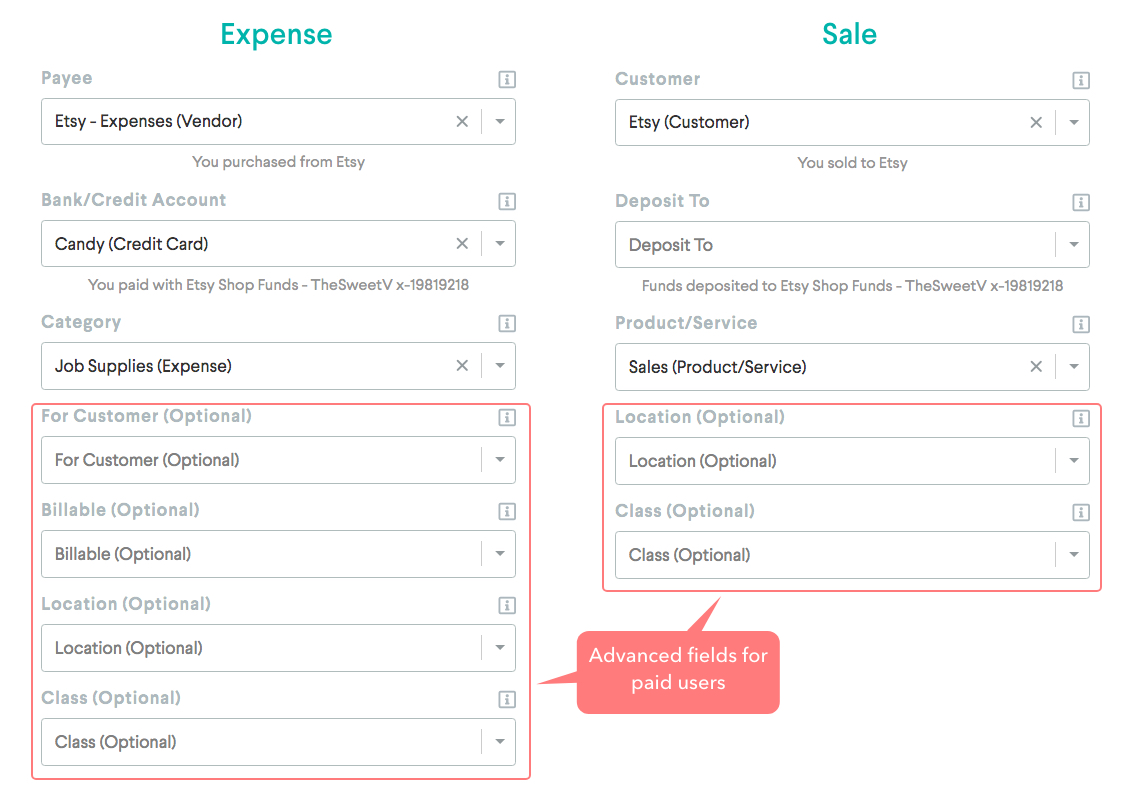
You can customize your advanced data export options with Commerce’s Accounting Data Export Preferences feature. Set your Time Zone, Summary or Itemized Mode, Shipping Total, Discounts, Contact Levels, and Item SKU Matching.
-> Learn how to configure your export preferences
Summary Mode
With summary mode, a transaction is exported as a single line item, associated to a single account in your accounting file.
For example, an Amazon expense that consists of 3 different products would be bundled into one expense category. The details of the order, including the description of all 3 items would be combined into the description field for the single line item expense.
Itemized Mode
With itemized mode, each line item within a transaction is separated and categorized separately.
For example, an Amazon expense that consists of three different products would require you to assign an expense category to each of the three items within the order.
QuickBooks Online Help
Do not copy the estimate to the invoice. Avoid putting Billable Expenses that are paid onto the invoice twice.
There are many ways to track expenses by job. QuickBooks Pro Advisors recommend Class Tracking as a Job Costing workaround. Remember to turn on Track Expenses by Items and Customer, and then turn on Projects in QuickBooks Online. -> Learn about the Job Costing Workaround via this video:
Once you have filled out all the fields, click the Export button. 
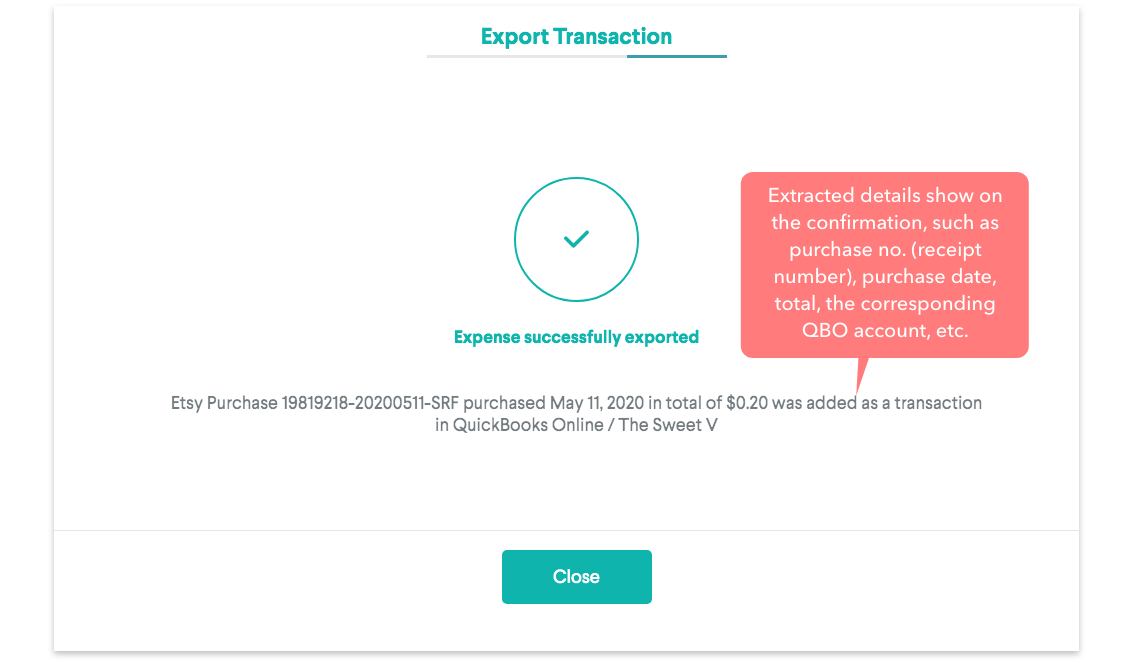
Export Step 3 of 3: Confirmation
If the export was a success you see the confirmation screen.
After Export
Go to QuickBooks Online to view the new or enhanced transaction. You will see that Commerce has completed the fields with receipt data, and attached the receipt when available.
Commerce does not create generic journal entries. Behind the scenes, Commerce will remember your export mappings for next time, set the date of the transaction, input the reference number, create a text receipt of the line items for the Description, map the transaction type for Expenses, Sales, Returns, Reimbursements, Invoices, Bills, etc, displays the real payment date, the sales tax, the shipping field, track the PO number, track classes, locations, departments, and categories, attach the receipt when available, and more.
Re-Export
If you make changes in QuickBooks Online that apply to an already exported transaction (such as adding a Product or Service) you may want to re-export the transaction to reflect the changes.
To re-export an Expense transaction:
- Click the three vertical dots
 menu >> Re-export transaction to accounting system.
Commerce recognizes it and suggests updating the existing transaction.

Whether it was voided (still visible but 0 amt) or deleted (can only view in audit log) in QuickBooks Online, it will be treated like an initial export. Return to Steps 1-3 to complete the export.
How to Optimize for Receipt Fetching
Not all stores/seller platforms track your receipts the same way. It could be by login ID, account, payment method, loyalty card, etc. Here are some tips on how to switch ON your receipt data.
Amazon (Purchases)
Automate Your Amazon Business Receipts
Amazon Seller Central (Sales)
Best Accounting Practices for Amazon Seller Central + Quickbooks
Etsy (also eBay sellers, Square) (Expenses and Sales)
Best Accounting Practices for Etsy + QuickBooks
Home Depot (Purchases)
How To Automate Your Online and In-Store Home Depot Receipts
How To Automate Home Depot Pro Xtra Receipts
How to Automate Home Depot Branded Credit Cards (Commercial) Lowe’s (Purchases)
How To Automate Your Lowe's In-Store and Online Receipts
Shopify (Sales)
Best Accounting Practices for Shopify + QuickBooks
Stripe (Sales)
Best Accounting Practices for Stripe + QuickBooks
Walmart (Purchases)