
Introduction
This article will take through how Greenback will map your sales transactions to both QuickBooks and Xero's chart of accounts.
For QuickBooks users
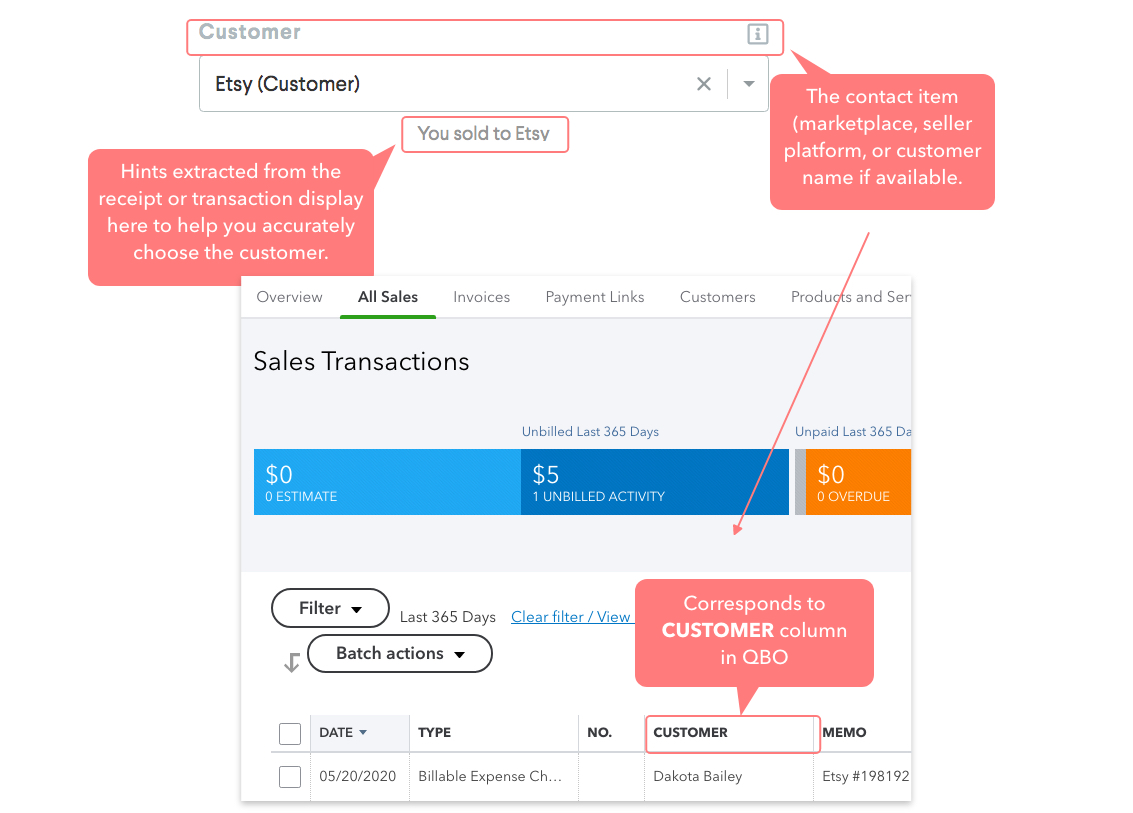
Customer Field
-> For more detail about Contact Levels, see Export Preferences.
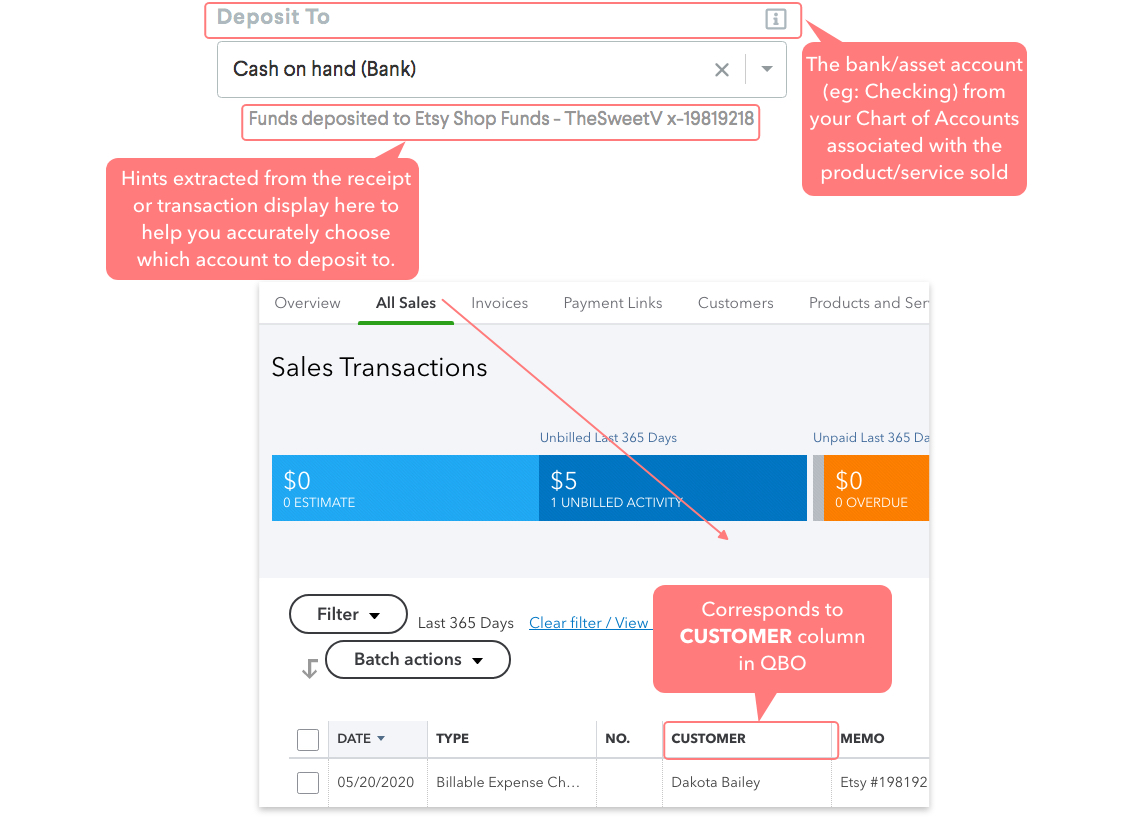
Deposit To Field
Product/Service Field
If you need to change the income account of a product/service type, make sure to do that in QBO before exporting.

To access the Sales Receipt screen in QBO:
- Click anywhere on the sales transaction.

- The Sales Transaction screen opens.
Tax Rate
The Tax Rate field is for the tax on the sale. Greenback pulls in what you have set up in QBO. You will see a hint (when available) to help you. (Ex: “Shipped to Birmingham, MI US 48009.”)
If you decide to change the tax rate, go to QBO first and then start your export over again.
If you need your sales data from a platform transformed (e.g. VAT amount needs reverse calculated on VAT Inclusive sales), send your request to: support@greenback.com. -> Also see Transforms by Greenback.
Greenback supports Class Tracking and Location Tracking for sales (and expenses). You can set it up to use either one separately or both of them together.
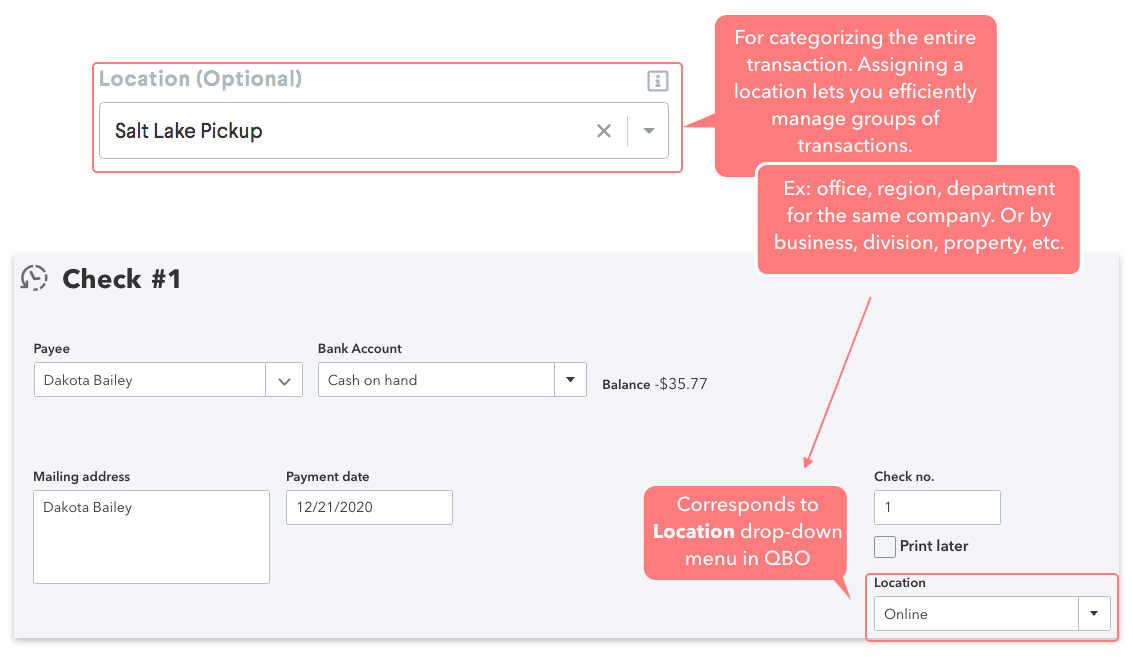
Location Field (Optional)
If Class Tracking and/or Location applies to this transaction, additional Category fields will display for each line item.
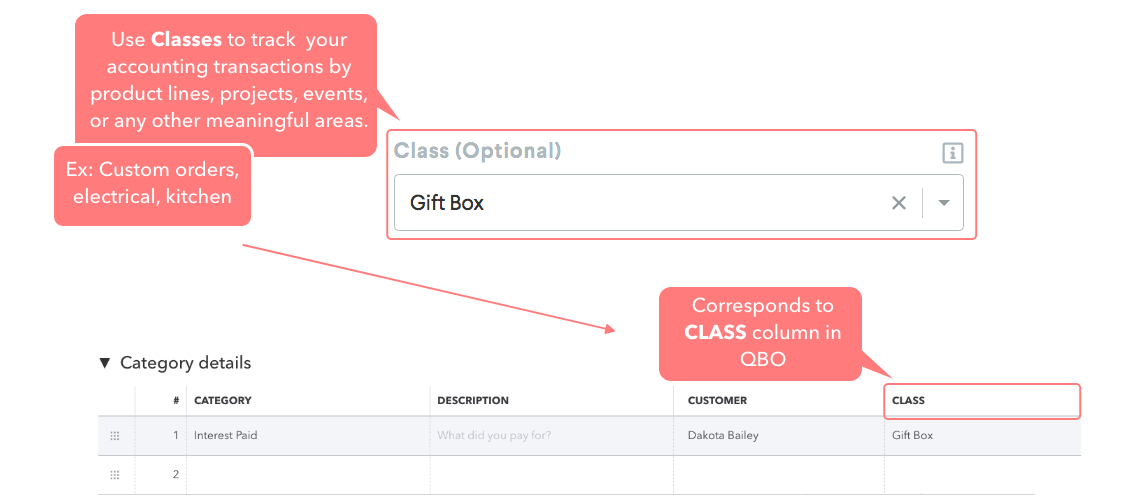
Class Field (Optional)
If you need Class Tracking and/or Locations, ensure they are set up in QBO before exporting. You can set it up to use either one separately or both of them together. (Greenback paid users only.)
-> Learn how to set up Class Tracking in QBO
-> Learn how and why to use Expense Classes
-> Learn more about Classes and/or Location Tracking
Class tracking can be to specify a different class for each detailed line item on your sales transaction. Make sure that you already assigned classes for a department, product, service, or special order etc. in QuickBooks. (eg: Electrical, Wall Clock, Design, Custom Striping).
For Xero Users
To Field
The “To” field is the Contact (marketplace, seller platform, or customer name (debtor) if available) that will be associated with the transaction. This mirrors the “To” field in the Xero UI on their own transaction form.
Type + Account Field
The “Type + Account” field is Greenback’s way of representing two concepts in one field. It represents both the type of transaction to create and which account the payment applies. Depending on how you have your Chart of Accounts set up in Xero, you may see “Invoice”, “Invoice + Payment”, and “Bank Transaction” types.
Invoice
This will create an “unpaid” Invoice (Sale) in Xero.
Invoice + Payment
This will create an Invoice (Sales) transaction and also create (apply) one or more Add payments in Xero. Greenback will display a unique “Invoice + Payment” entry for every account you’ve flagged as “payable” in Xero. See Enable Payments to an Account and Record Payment of a Sales Invoice
Bank Transaction
This will create a Receive Money transaction in Xero. Greenback will display a unique “Bank Transaction” entry for every bank account in Xero.
Choosing the right method
Either Invoice + Payment or Bank Transaction accomplish the same general goal. Depending on your Xero subscription, you may have limited “Invoices” you are allowed to create. In that case we’d suggest you primarily use Bank Transactions. If you have unlimited Invoices then we suggest you use Invoice + Payment.
Hints extracted directly from the sales receipt or ancillary transaction will display below a field to help you accurately decide the export destination. Ex: “Shipped to Birmingham, MI US 48009”, “You were paid with Etsy Shop Funds-Acme Soap x-1200400", etc.
Line Item Account Field
“The Line Item Account” field is the account to associate with the Sale. Usually, you think of this as the “category” of what you’ve received, but in double entry bookkeeping it’s possible it represents something else. This mirrors the “Account” field in the Xero UI on their own transaction line items. Select the default remembered from the last export or select from the drop-down menu. You should see the account code, account name, and the account type (Revenue, etc). Ex: 400 Sales (Revenue). If you need a new account, go to Xero to add it and then start your export over again in Greenback. The drop-down menu is in CoA order and displays the right group to help you.
Tax Rate
The “Tax Rate” field is for the tax on the invoice/sale. Greenback pulls in what you have set up in Xero. You will see a hint (when available) to help you. Ex: “Shipped to Birmingham, MI US 48009”. If you decide to change the tax rate, go to Xero first and then start your export over again. If you need your sales data from a platform transformed (e.g. VAT amount needs reverse calculated on VAT Inclusive sales, etc), send your request to: support@greenback.com. Also see Transforms by Greenback.