Sign In
Sign in with QuickBooks
To access Greenback from QuickBooks Online, go to Apps in the left nav, and then the My Apps tab. Select Greenback and click on Launch in the dropdown (if it needs reconnected, you will get a Connect prompt).
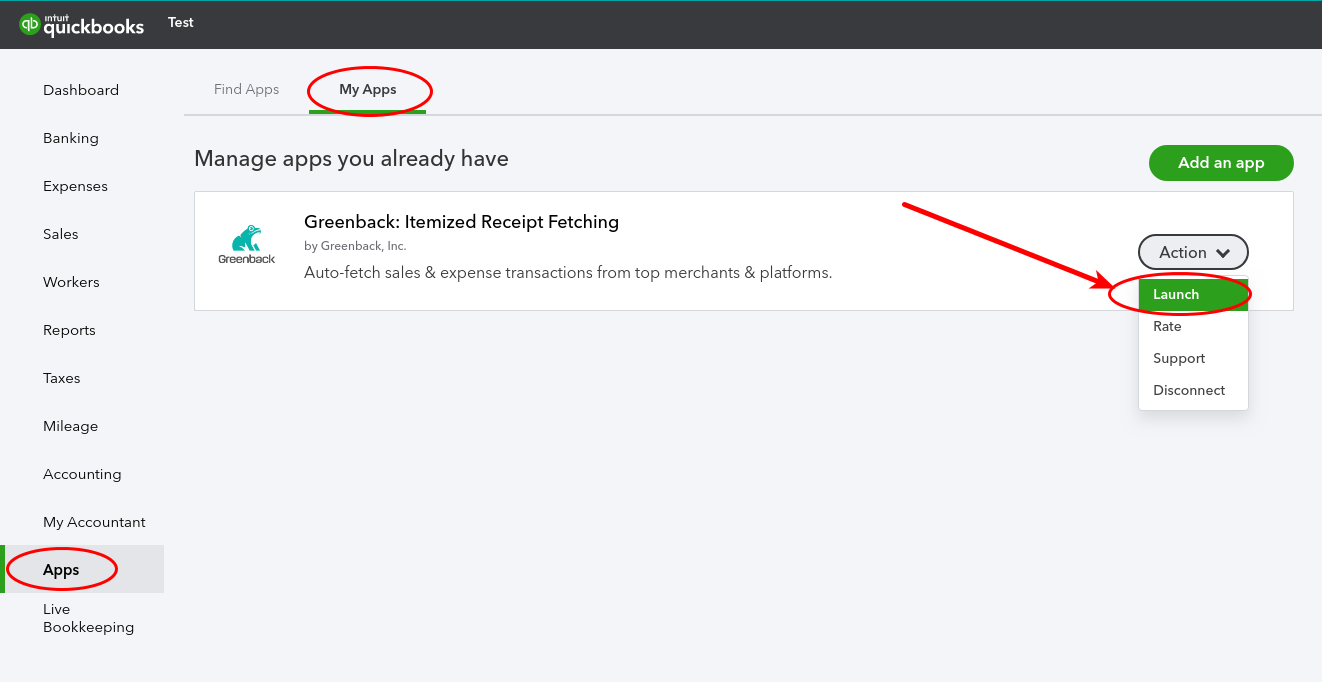
Sign in to Greenback from QuickBooks Online with our "Single Sign On" feature. Just click Launch under My Apps.
Sign In Directly to Greenback
To access Greenback directly, locate the Sign In in the top right corner of the home page.
Passwords
Greenback Login Credentials
Login credentials authenticate a user when logging in. To access your Greenback user account, it is the email address and password you used when you created your account. If you aren't sure what your login credentials are, you may have created your account using the single sign on button on an integration's website (e.g. QuickBooks Online, Etsy, Stripe etc.). Greenback automatically creates a user account for you with the email address associated with the integration and a randomized secure password. You can reset your password to match your integration account or create a new password at any time. For other types of accounts (e.g. vendors, suppliers, marketplace platforms) see Account Login Credentials.
Reset Password
If you’ve forgotten your password or need to reset it, you can click on Forgot Your Password?. The email address associated with your user account will receive a time-sensitive link. If you do not receive one, be sure to check your Spam folder. Click on the reset link to create a new password. Entering the old one isn't required. When you are finished, a “Your Password Was Reset” message is emailed for security. If you are a collaborator on a shared account, only the password for your own Greenback user account is reset. The original owner's account remains the same.
Update Your Email Address
To update the email address associated with your Greenback account --as the owner of the user account with admin rights-- click on your name on the left. Under Profile, input your new email address and then click Update. Next, you will see an “Email update pending. Check your email for instructions.” message to verify the email. Your new address only updates your login credentials and does not affect your Mailbox by Greenback settings.
Pro-Tip: If you have a password manager or allow your browser to save your passwords, don't forget to update globally.
Accounts
Account Login Credentials
Greenback accesses your accounts (e.g. Home Depot, Staples, QuickBooks Online etc.) on your behalf. Your login credentials will typically consist of your username (email) and password. Make sure to test that they work first and are error free before inputting them on our platform to ensure successful syncs. Authentication errors are usually caused by typos or login credentials that need updated, or browser-saved passwords were replaced automatically, multiple accounts (e.g. several Amazon accounts), etc.
Two-Factor Authentication
Two-factor authentication is the security method an account (e.g. Amazon, Uber) uses to confirm your identity in order to permit access. When connecting a new account, make sure to wait up to 1 minute for the code prompt to appear. You will receive a push notification via text, phone, or email with a temporary code that expires in 3 minutes. You only need to input it once to complete your setup. If you have an authenticator app, be sure to check there for your code. Occasionally sites require you to re-authenticate due to account inactivity, for security reasons, or updates.
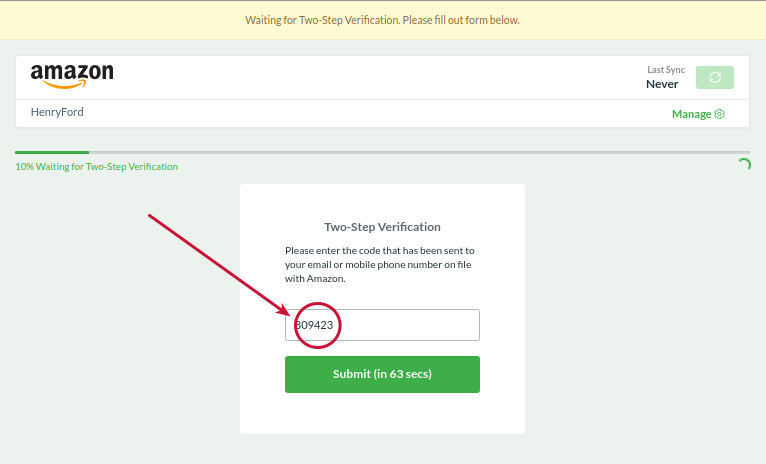
Enter your temporary verification code for accounts with two-factor enabled.
Share an Account with Another User
Sharing an account with someone gives them full access (except admin rights) to each integration (e.g. Home Depot) you share. From your dashboard, click on the integration in the left nav, then click on the gear icon in the top right. Next, click on the “Collaborators” Tab. Input the email address of who you want to collaborate with such as your bookkeeper, or accountant. They will be prompted to create their own Greenback account with their own login credentials. You can keep an integration private by not sharing it. They can only access the ones you specifically shared.
![]()
Click on the gear icon to manage your account.
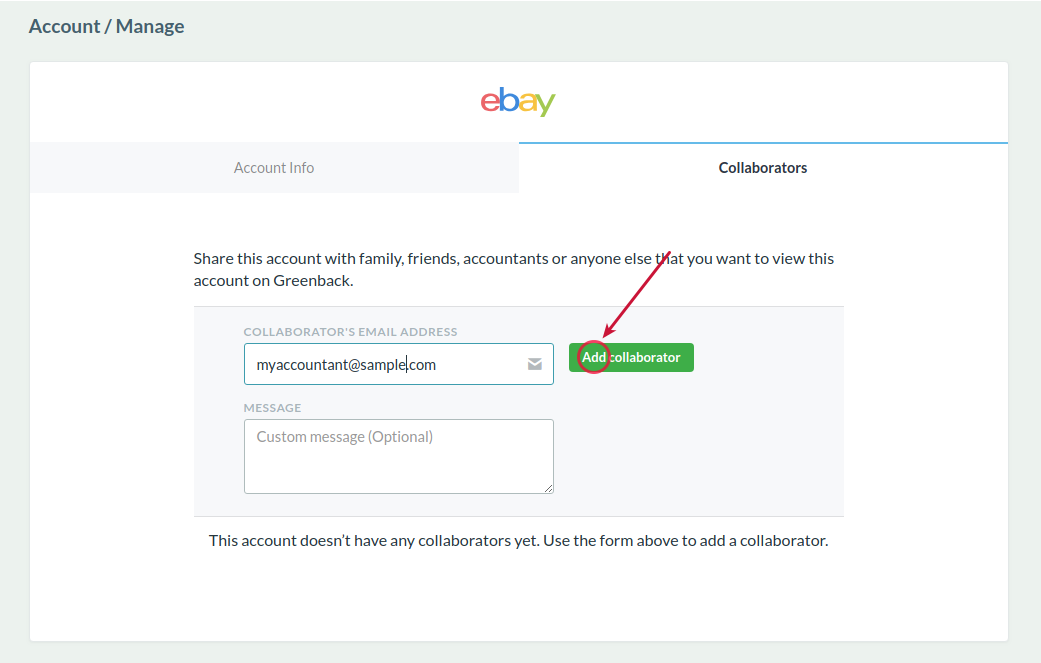
Click the "Add Collaborator" button to send a request to the email address you want associated with your integration.
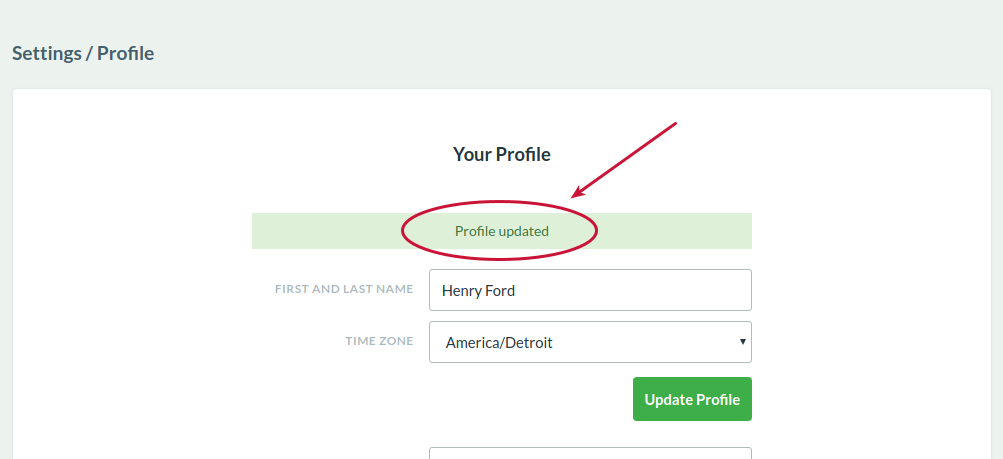
Update Your Profile Name
In the rare occurrence that you need to update your first or last name --as the owner of the user account with admin rights-- click on your name on the left. Under Profile, input your new first and/or last name and don't forget to click Update. If you needed to update your email address also, we recommend completing that process first before coming back to this step. Your new name will appear in the top left corner. Click on the Refresh arrow in your browser if you don't see your updated name.
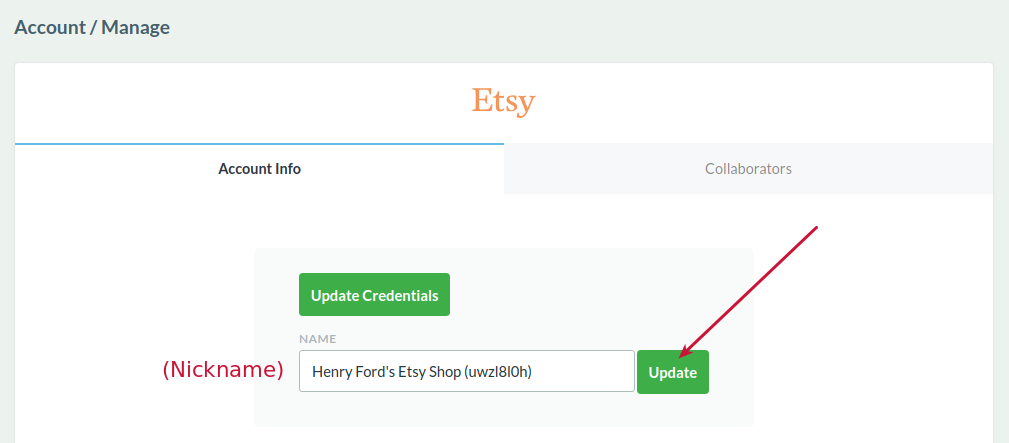
Update an Account Name
You can update an account name if you wish, to keep track of them. Renaming it only changes what displays. A name update doesn't affect the account credentials or where the data is fetched from. From your dashboard, choose the account (e.g. Etsy shop) from the left nav. Then at the top right of your screen, click on the Manage gear icon (or you can click on your Greenback profile name and then Accounts). Input the new name, and click the Update button. You will then see the “Account name has been updated” message immediately. To see the new name, just refresh your browser or click on the account on the left nav again.
![]()
Transactions
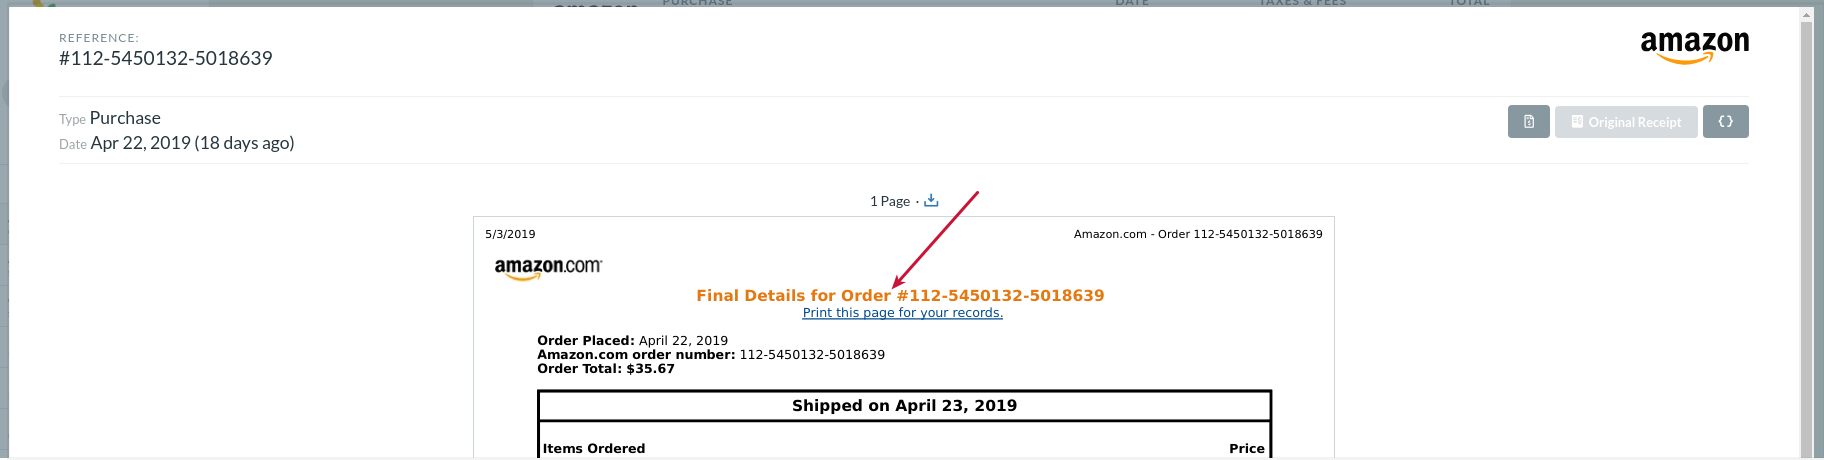
Original Receipts
An original receipt is a PDF file from an upstream integration (e.g. Amazon) that is usually provided in your Order History. The original receipts provided by this authoritative source are shown in your Greenback transaction feed with a special callout. If an original receipt is available, a receipt icon will be visible on that specific transaction.
![]()
Click on the receipt icon to view or download it.
When the upstream integration (or transaction type) doesn't support or provide original receipts (e.g. Etsy), you can take advantage of Greenback-generated receipts for a digital audit trail and tax compliance.
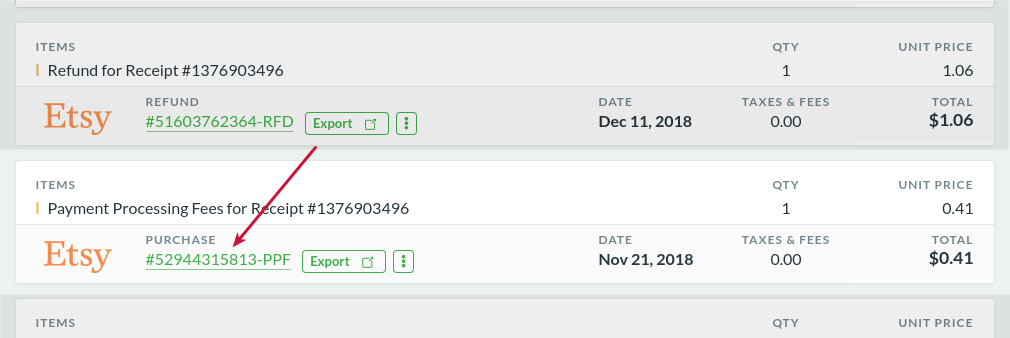
Click on the transaction # number to view or download the Greenback-generated receipt.
Original VAT Invoices
An original VAT invoice is a PDF file from an upstream integration (e.g. Amazon) that is usually provided in your Invoices tab. The VAT/GST/HST/PST invoices provided by this authoritative source are shown in your Greenback transaction feed with a special callout. If a VAT invoice (created by the seller) is available, an invoice icon will be visible on that specific transaction.
![]()
Click on the VAT invoice icon to view or download it.
Search Transactions
To learn how to use our faceted search engine and templates see Greenback’s Flexible, Powerful Search.
Accounting
Reconciling Payouts and Transfers
Some accounts hold funds on your behalf and periodically transfer payouts (e.g Etsy sales, Stripe payments) to one of your bank accounts. It's important to remember it's a revolving balance of cash and not always a clear cut batch of settled transactions. There could be sales, holdbacks/reserves, miscellaneous credits/debits, time zones, cut-off times etc. For example, a sale occurring at 1:00 PM may not be included with a payout initiated at 1:02 PM.
Payouts are simply cash transfers from one account to another. Not a batch of transactions. It's the same as transferring cash from one personal bank account to another. You are transferring money. Payouts from Etsy or Stripe are just transfers of money from one account to another too. But how do you reconcile the transfers and feel confident you've accounted for everything?
The best practice is to reconcile overall balances and net-profits. If Greenback's total sales, total expenses, and net-profits match for example your Etsy shop statement, then you've reconciled the Etsy -> to Greenback data is 100% accurate. When you export all of your transactions, then you've reconciled the Greenback -> to your Accounting Package (optional) data is also 100% accurate. Therefore, Etsy -> Greenback -> Accounting Package is reconciled. Additionally, if you've setup an Etsy Shop funds account in your Chart of Accounts, then the balance in your Etsy shop should match it. The only exception would be a payout currently in-flight (since bank transfers can take a few days).
Handling Deposits on Your Bank Feed
If you have bank feeds setup in your accounting package, you'll have transactions (deposits) appear that represent the payouts from your selling platform. You may notice that Greenback doesn't create any transfer types of transactions on our platform or export any to your accounting package either. In order to simplify the processing of your bank feed, we chose not to track the transfers.
Here's why. First, if you sync and import your bank feed before exporting your data from Greenback, we would need to find a match during the export. Otherwise you'd have a possible duplicate transfer. Second, in the reverse direction, if you export from Greenback first and then import your bank feed, you'd need to hope your accounting package finds a match. Based on our product research, rather than introduce this scenario, we decided it's best to let your bank feed be the authoritative source of transfers.
Since Greenback exports the sales & expense data--while we leave the transfers to your bank feed--every deposit in your bank feed can be simply marked as a transfer on your books. Your accounting package may either remember you did this after the first time, or you can setup a rule to have it do that every time.
Integrations
Connecting Greenback + Stripe
From the Greenback dashboard, click “Connect” in the left nav, find Stripe and click on "Connect", and click Connect again. You'll be redirected to Stripe where you can follow the steps to authorize Greenback to connect to your account eg: Connect My Stripe Account.
Once you’ve completed that, you'll be redirected back to Greenback where an initial sync will complete. You will see your sales, payment processing/merchant fees, purchases, refunds, etc. if you have any.
Amazon Seller Sync Frequency
Greenback automatically syncs to your Amazon Seller account and shows when the last sync occurred at the top of your dashboard. Your sync frequency can vary and depends on many factors. It may or may not match how often Amazon creates a finalized settlement statement for you (which can range from 3-14 days), your overall sales volume, etc. The sync frequency (and what data we include) was carefully designed based on years of experience capturing Amazon data and user feedback. If you would like to do an on-demand sync, you can click on the sync button at the top of your dashboard. Remember though that a new sync will only show data from "closed" statements ie: fulfilled orders and their relevant fees that have been "settled" by Amazon and posted to your finalized settlement statements. Orders that haven't been posted yet are considered "unsettled" or "pending" and are not included in the batch. Since there have been edge cases where Amazon has not posted pending orders to the next settlement statement, this is the most robust way to ensure your data is accurate and safe to export to your accounting package.